
Those who code in Android studio may have face some problems about connecting android studio with GitHub account and send codes simultaneously. Here is one of the easiest solutions. which may can make your coding journey much easier and help you to upload codes to GitHub very easily. Here it is:
At the very beginning, we must have a GitHub account. (if not, you may find lot’s tutorials to create a net GitHub account. Also, you can find it here…)
After having a GitHub account, we have to log in to our GitHub account and create a new repository. We can create repository from top of the page (or you may find it anywhere else).
To create repository, we must have to enter a repository name (suppose I entered “my_repository”) and then we will click on “create repository” button bellow.
Then we have to scroll down and find the second section named
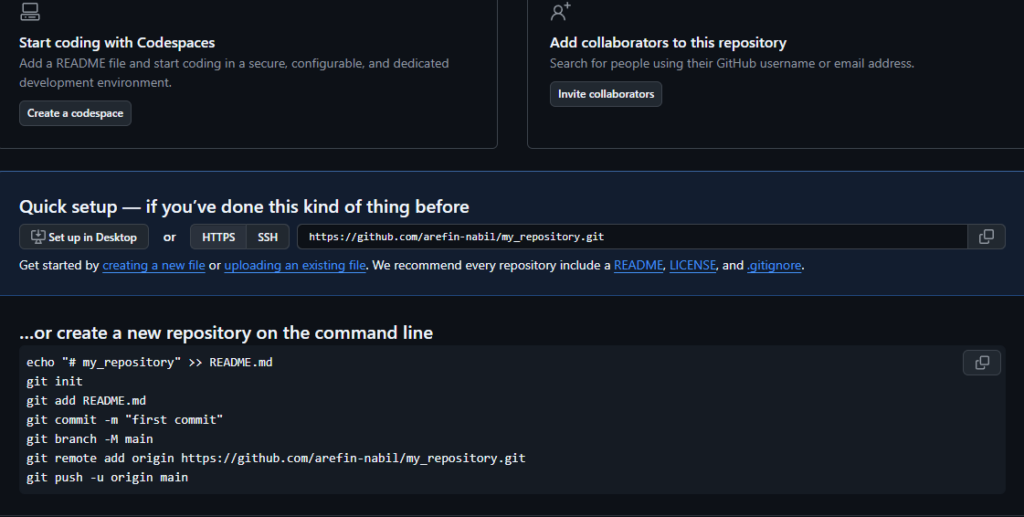
…or push an existing repository from the command lineand we will copy the first line from this part which will be like
git remote add origin https://github.com/arefin-nabil/my_repository.gitit is actually our GitHub’s repository’s link with some extra codes.

After that we will go to our android studio (Make sure that Git is already installed in our Computer/Laptop) and we will open terminal
(To open terminal go to View > Tool Windows > Terminal in Android Studio to access the integrated terminal).
After finishing these, We will write
git initon terminal. (It will initialize git and create a hidden folder in disk). After that we will hit enter from key-board.
Now we will paste the command line in terminal which we had copied in step 2. that is
git remote add origin https://github.com/arefin-nabil/my_repository.gitAfter pasting we will hit from key-board.
Then we will write on terminal
git add .(It makes connections between and GitHub and prepares them to commit/push code. So, now we can push the code directly, also we can commit anything)
We can use
git statusto check that is there any code which is not committed or added. (Definitely it’s not mandatory, it’s just for checking the connection).
Now, an important step. Committing codes to GitHub.
For this we will use
git commit -am "first commit"Finally, pushing codes to GitHub. To push this code on GitHub we have to write
git push origin masterin our terminal. (For the first time it may take us to the browser where we will have to add our GitHub account.)
Hurray, after doing these steps, our code is already pushed to the GitHub. we can find out this in our account repository section.
At a glance
create repository
get repo link with commands = git remote add origin https://github.com/your-username/repo-name.git
go terminal
write = git init ## Initialize Git repository
paste = git remote add origin https://github.com/arefin-nabil/my_repository.git ## Link to GitHub
write = git add . ## Stage all files
write = git commit -am “first commit” ## Commit files with a message
write = git push origin master ## Push to GitHub
write = git status ## Check status (optional)
বাংলায় Android studio এর সাথে GitHub account কানেক্ট করার নিয়ম
যারা Android studio এর সাথে GitHub account কানেক্ট করে কোড পুশ করতে সমস্য ফেস করছেন এই ব্লগটি তাদের জন্য। এখানে আমরা সবচেয়ে সহজ পদ্ধতিতে GitHub account এর সাথে Android studio কানেক্ট করা ও কোড পুশ করা শিখবো।
সর্বপ্রথম আমাদের GitHub account থাকতে হবে। যাদের কোনো গিটহাব একাউন্ট নেই তারা যেকোনো টিউটরিয়ল দেখেই একাউন্ট ক্রিয়েট করে ফেলতে পারবেন। আজকে আরে সেদিকে যাচ্ছি না। তবে GitHub account খুলতে এং লিংক ফলো করতে পারেন।
গিটহাব একাউন্ট যাদের আছে আমরা একাউন্টে লগ ইন করে একটা নতুন repository তৈরী করবো। GitHub এর হোম পেজ এর উপরেই repository তৈরী করার অপশন আছে।
নতুন repository তৈরী করতে অবশ্যই এর একটা নাম দিতে হবে। আমরা আপতত “my_repository” নাম ব্যবহার করছি। নাম দেওয়ার পর আমরা নিচে “create repository” বাটনে ক্লিক করবো।
এরপর নতুন যেই পেজ আসবে সেখানে স্ক্রল করে নিচে যাবো আর
…or push an existing repository from the command lineনামে একটা সেকশন পাবো। এই সেকশনের প্রথম লাইন টা আমরা কপি করে রাখবো। যা হবে
git remote add origin https://github.com/arefin-nabil/my_repository.gitএরকম। এটা মূলত আমাদের তৈরী করা গিটহাব রিপোসিটরি এর লিংক সাথে কিছু এক্সট্রা কোড সহ। এটা আমরা একটু পরেই ব্যবহার করবো।
এখন আমরা android studio তে যাবো এবং terminal open করবো। terminal খুঁজে না পেলে
View > Tool Windows > Terminal
এর আগে অবশ্যই কম্পিউটারে গিট ইনস্টল করা থাকতে হবে। কীভাবে গিট ইনস্টল করবেন?
সব রেডি থাকলে এবার টারমিনালে লিখবো
git initএবং কী-বোর্ড থেকে enter প্রেস করবো। (এর কাজ হলো কম্পিউটারে একটা হিডেন ফোল্ডার তৈরী করা।)
আমাদের আগের কপি করে রাখা কোড এবার কাজে আসবে। এখন টার্মিনালে সরাসরি কপি করা
git remote add origin https://github.com/arefin-nabil/my_repository.gitলাইনটা পেস্ট করে কী-বোর্ড থেকে enter চাপবো।
এরপর আবার টারমিনালে লিখবো
git add .এবং কী-বোর্ড থেকে enter প্রেস করবো। (এটা মূলত android studio তে গিট কে কানেক্ট করে। )
আমরা চাইলে কানেকশন স্ট্যাটাস চেক করে দেখার জন্য
git statusব্যবহার করতে পারি।
এবার সবচেয়ে ইমপরটেন্ট স্টেপ। গিটহাবে কোড কমিট করার জন্য আমরা
git commit -am "first commit"কমান্ড ব্যবহার করবো।
সর্বশেষ, গিটহাবে কোড পুশ করার পালা। এর জন্য আমরা
git push origin masterকমান্ড ব্যবহার করবো। পুশ করার সময় প্রথম বার ব্রাউজারে নিয়ে যেতে পারে গিটহাব একাউন্ট কানেক্ট করার জন্য।
অবশেষে Android studio থেকে আমাদের গিটহাব একাউন্টে সরাসরি কোড পাঠানো শেষ হলো। গিটহাব একাউন্টে গিয়ে repository তে গেলে আমরা এই কোড দেখতে পাবো।
ধন্যবাদ।
সাপ সম্পর্কে বিষদে জানতে ও নিকটবর্তী রেসকিউয়ারের সাথে যোগাযোগ করতে আমাদের মোবাইল অ্যাপ ডাউনলোড করুন।
অন্যান্য সাপ সম্পর্কে জানতে ক্লিক করুন।